We Knead to bake, a group of bakers eagerly learning to bake bread every month, lead by Aparna of My Diverse Kitchen. Last Month we made Pull-Apart Bread and for this month, aparna thought of giving some exercise to our Bingo Wings!!!! Yup, we made Croissants!!!!!

When Aparna posted the recipe, My first thought was, oh my!!! Such a long process, will i be able to do??? But as members of our group started posting Pictures of the final product, i got the courage and particularly Lataji, such a enthusiastic and bubbling person she is, when i saw her pics of baking these french beauties for the second time with her hubby i felt more encouraged and went through the recipe and baked it and I Loved it!!!! It is such a happy feeling to see those croissants browning and puffing up in the Oven and even more rewarding when your people go mmmm, aaawwww, after the first bite.
Thanks to Aparna, she gave us such a detailed instructions and a fool-proof recipe. All you have to do is read the recipe and the tips carefully to get a Utterly, Buttery and a Flaky Croissants!!!! 🙂
I made the original proportions of the dough. Divided it into 4 equal parts and made croissant with 2 parts and have freezed the remaining 2 parts. Maybe someday in the week i will try Pain Au Chocolat. Stuff the croissant with a piece of Chocolate and bake, preferably dark, it will be heaven!!!!
I made the original proportions of the dough. Divided it into 4 equal parts and made croissant with 2 parts and have freezed the remaining 2 parts. Maybe someday in the week i will try Pain Au Chocolat. Stuff the croissant with a piece of Chocolate and bake, preferably dark, it will be heaven!!!!

Recipe Source : Adapted from Jeffrey Hamelman's recipe at Fine Cooking
Ingredients:
For
the dough:
the dough:
4 cups all-purpose flour, and a little more
for dusting/ rolling out dough
for dusting/ rolling out dough
½ cup plus 2 tablespoon cold water
½ cup plus 2 tablespoon cold milk (I used 2%)
¼ cup granulated sugar
40gm/3.5tbsp soft unsalted butter
1 tablespoon plus scant ½ teaspoon instant yeast
2 teaspoon salt
For
the butter layer:
the butter layer:
250 gm cold unsalted butter
¼ cup of cold milk for brushing the dough or 1 egg for egg wash
Method:
Day
1:
1:
Make
the dough (and refrigerate overnight)
the dough (and refrigerate overnight)
- Combine all the ingredients for the dough
in a bowl and knead for 5 minutes to make a dough.Lightly flour a 10-inch pie pan or a dinner plate. And place the ball of dough on this. - Gently shape the dough into a flat ball by
pressing it down before storing it in the fridge, this makes rolling out next
morning easier. Making a tight ball will strengthen the gluten which you do not
need. Lightly dust the top of the dough with flour and wrap well with plastic
so it doesn't dry out. Refrigerate overnight.

Day
2:
Make
the butter layer
the butter layer
- The next day, cut out 2 pieces of parchment
or waxed paper into 10" squares each.
Cut the cold butter into ½-inch-thick slabs. Place these pieces on one
piece of parchment/ waxed paper so they form a 5- to 6-inch square. Cut the
butter further into pieces as required to fit the square. Top with the other
piece of parchment/ waxed paper.
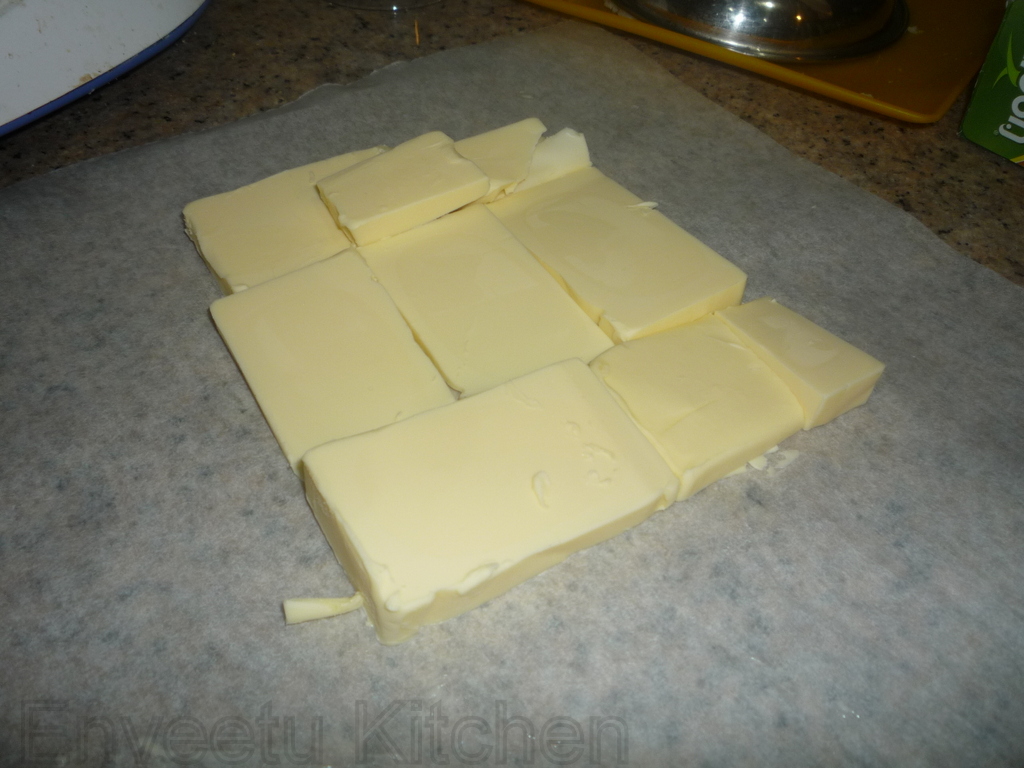
- Using a rolling pin, pound the butter with
light, even strokes. As the pieces begin to stick together, use more force.
Pound the butter until it flattens out evenly into a square that's approximately
7-½". Trim the edges of the butter to make a neat square. Put the trimmings
on top of the square and pound them in lightly with the rolling pin.
Refrigerate this while you roll out the dough.
Laminate
the dough
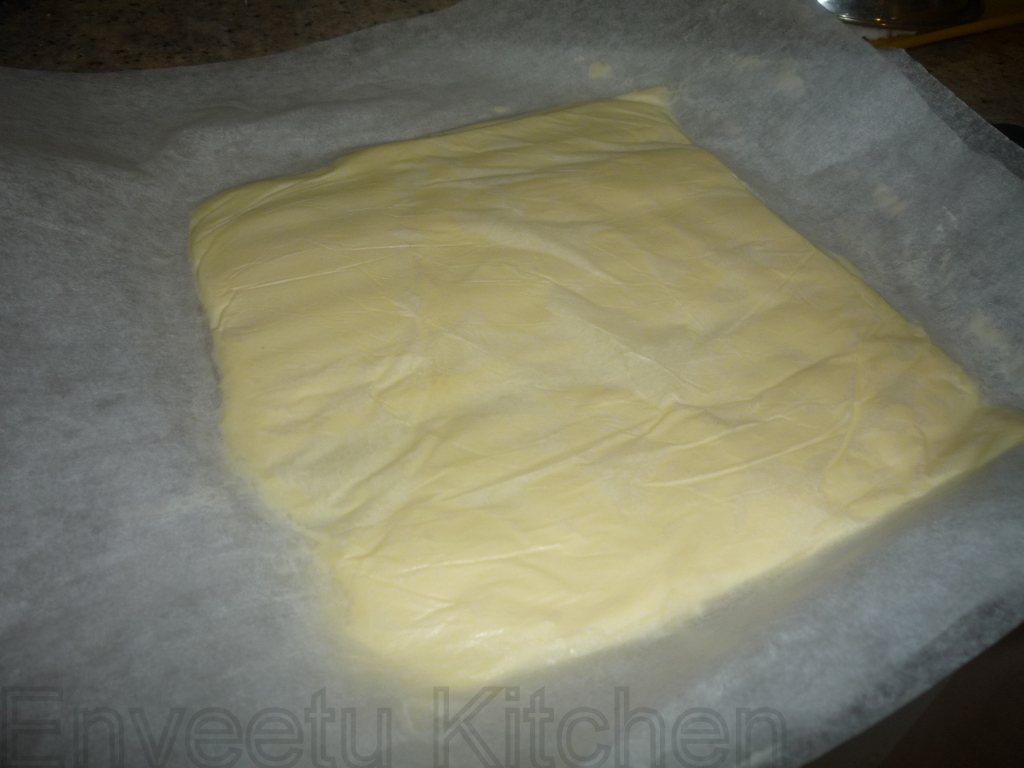
- Unwrap and lay the dough on a lightly
floured work surface. Roll it out to a 10-½-inch square, and brush off the
excess flour. Take the butter out from the refrigerator -it should be cold but
pliable. If it isn't refrigerate it till
it is. This so that when you roll out the dough with the butter in it, neither
should it be soft enough to melt, or hard enough to break. Unwrap the butter and
place it on the square of dough in the centre, so that it forms a "diamond"
shape on the dough. - Fold one flap of dough over the butter
toward you, stretching it slightly so that the point just reaches the middle of
the butter square. Bring the opposite flap to the middle, slightly overlapping
the previous one. Similarly repeat with the other two so that the dough forms
an envelope around the butter. Lightly press the edges together to completely
seal the butter inside the dough to ensure the butter doesn't escape when you
roll out the dough later. - Lightly flour the top and bottom of the
dough. With the rolling pin, firmly press along the dough uniformly to elongate
it slightly. Now begin rolling instead of pressing, focusing on lengthening
rather than widening the dough and keeping the edges straight.

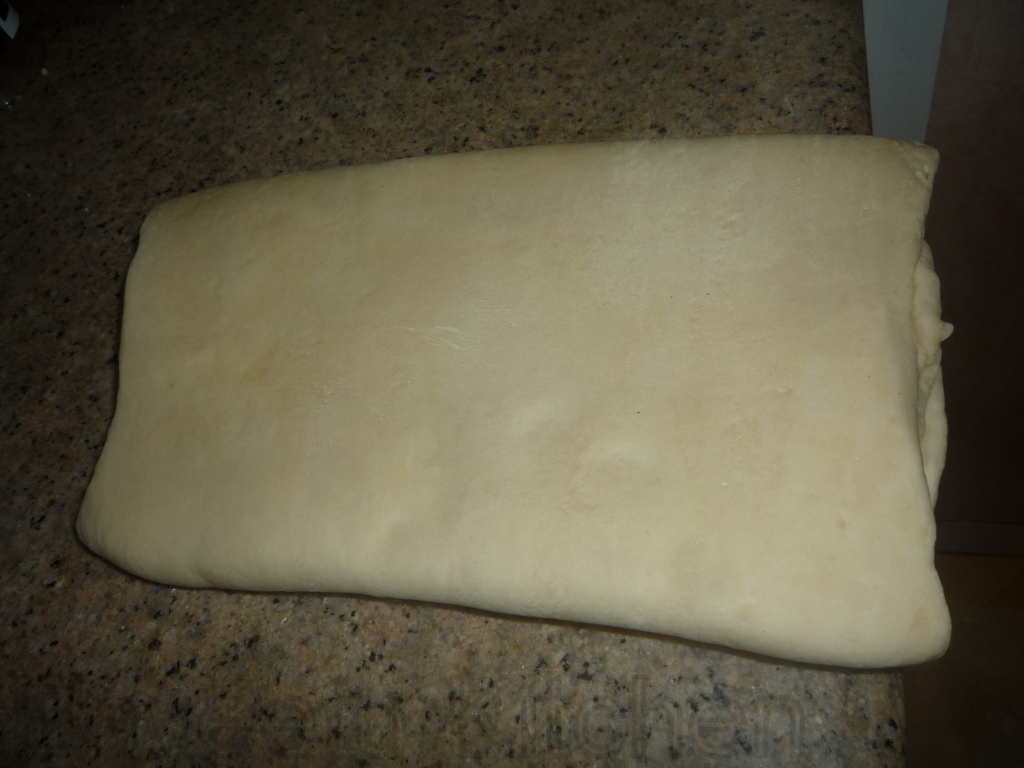
- Roll the dough into an 8" by 24" rectangle.
If the ends lose their square shape, gently reshape the corners with your
hands. Brush off the excess flour. Mark the dough lightly equally into three
along the long side. Using this as a guideline, pick up one short end of the
dough and fold ⅓rd of it back over the dough, so that ⅓rd
of the other end of dough is exposed. Now fold the ⅓rd exposed
dough over the folded side. Basically, the dough is folded like 3-fold letter
before it goes into an envelope (letter fold). Put the folded dough on a floured
baking sheet, cover with plastic wrap, and freeze for 15 to 20 minutes to relax
and chill the dough.
- Repeat the rolling and folding, this time
rolling in the direction of the two open ends (from the shorter sides to
lengthen the longer sides) until the dough is about 8" by 24". Once again fold
the dough in thirds, brushing off excess flour and turning under any rounded
edges or short ends with exposed or smeared layers. Cover once again with
plastic wrap and freeze for another 15 to 20 minutes.
- Roll and fold the dough exactly in the same
way for the third time and put it baking sheet. Cover with plastic wrap,
tucking the plastic under all four sides and refrigerate overnight.
Day
3:
Divide
the dough
the dough
- The next day, unwrap and lightly flour the
top and bottom of the dough. Cut the dough along the longer side into halves.
Cover one half with plastic wrap and refrigerate it while working on the other
half. - "Wake up the dough up" by pressing firmly
along its length with the rolling pin. Don't widen the dough but simply begin
to lengthen it with these first strokes. Slowly roll the dough into a long and
narrow strip, approximately 8" by 22". If the dough sticks as you roll,
sprinkle with flour. - Once the dough is about half to two-thirds
of its final length, it may start to resist rolling and even shrink back. If
this happens, fold the dough in thirds, cover, and refrigerate for about 10
minutes; then unfold the dough and finish rolling.
- Lift the dough an inch or so off the table
at its midpoint and allow it to shrink from both sides and prevent the dough
from shrinking when it's cut. Check that there's enough excess dough on either
end so that when you trim the edges to straighten them, you have a strip of dough
that is 20' inches long. Now trim the edges so they're straight.
- If you're good at "eyeballing" and cutting
the dough into triangles, then forget the measuring rule, marking and cutting
instructions. Otherwise, lay a measuring
rule or tape measure lengthwise along the top length of the dough. With a
knife, mark the top of the dough at 5-inch intervals along the length (there
will be 3 marks in all). Now place the rule or tape measure along the bottom
length of the dough. Make a mark 2-½ inches in from the end of the dough.
Make marks at 5-inch intervals from this point all along the bottom of the
dough. You'll have 4 marks that fall halfway between the marks at the top. - Make diagonal cuts by positioning the
yardstick at the top corner and the first bottom mark. Use a pizza wheel/ pie
wheel or a bench scraper and cut the dough along this line which connects each
top mark to the next bottom mark and then back to the next top mark and so on.
This way you will have 7 triangles and a scrap of dough at each end.

Shape
the croissants

the croissants
- Now work with one piece of triangular dough
at a time. Using your rolling pin, very lightly roll (do not make it thin but
only stretch it slightly) the triangle to stretch it a little, until it is
about 10" long. This will give your croissants height and layers. You can
stretch it by hand too, but if you don't have the practise, your stretching
could be uneven. - Using a sharp small knife, make a ½- to
¾-inch-long notch in the centre of the short side of each triangle. The notch
helps the rolled croissant curl into a crescent. - Place the triangle on the work surface with
the notched side closest to you. With one hand on each side of the notch, begin
to roll the dough away from you, towards the pointed end. - Flare your hands outward as you roll so
that the notched "legs" become longer. Roll the triangle tight enough but not
too tight to compress it, until you reach the "pointy" end which should be
under the croissant. - Now bend the two legs towards you to form a
tight crescent shape and gently press the tips of the legs together (they'll
come apart while proofing but keep their crescent shape). - Shape all the triangles like this into
croissants and place them on a greased or parchment lined baking sheet leaving
as much space between them as they will rise quite a bit.
Proof
the croissants
- Brush the croissants with milk (or a mix of
milk and cream). If you use eggs, make an egg wash by whisking one egg with 1
tsp water in a small bowl until very smooth. Lightly brush this on each
croissant. - Refrigerate the remaining milk/ milk+cream
(or egg wash) for brushing the croissants again later. Place the croissants in
a cool and draft-free place (the butter should not melt) for proofing/ rising
for about 1 ½ to 2 hours. They might
need longer than 2 hours to proof, maybe as much as 3 hours, so make sure to
let croissants take the time to proof. The croissants will be distinctly larger
but not doubled in size. They're ready if you can see the layers of dough from
the side, and if you lightly shake the sheets, the croissants will wiggle.
Bake
the croissants
- Just before the croissants are fully
proofed, pre-heat your oven to 200C (400F) in a convection oven or 220C (425F)
in a regular oven. Brush the croissants with milk/ milk+cream (or egg wash) a
second time, and place your baking sheets on the top and lower thirds of your
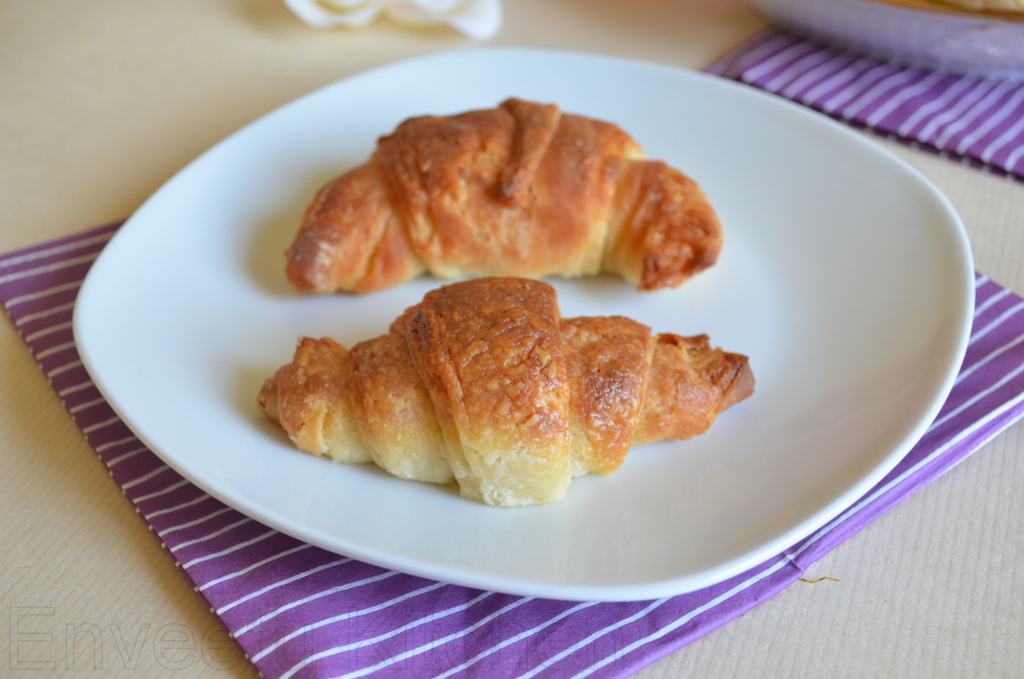
oven (if regular) or bake one tray at a time in the convection oven. - Bake them for about 15 to 20 minutes till
they're done and golden brown on top and just beginning to brown at the sides.
In a regular oven, remember to turn your baking sheets halfway through. If they
seem to be darkening too quickly during
baking, lower the oven temperature by 10C (25F). Cool the croissants on the
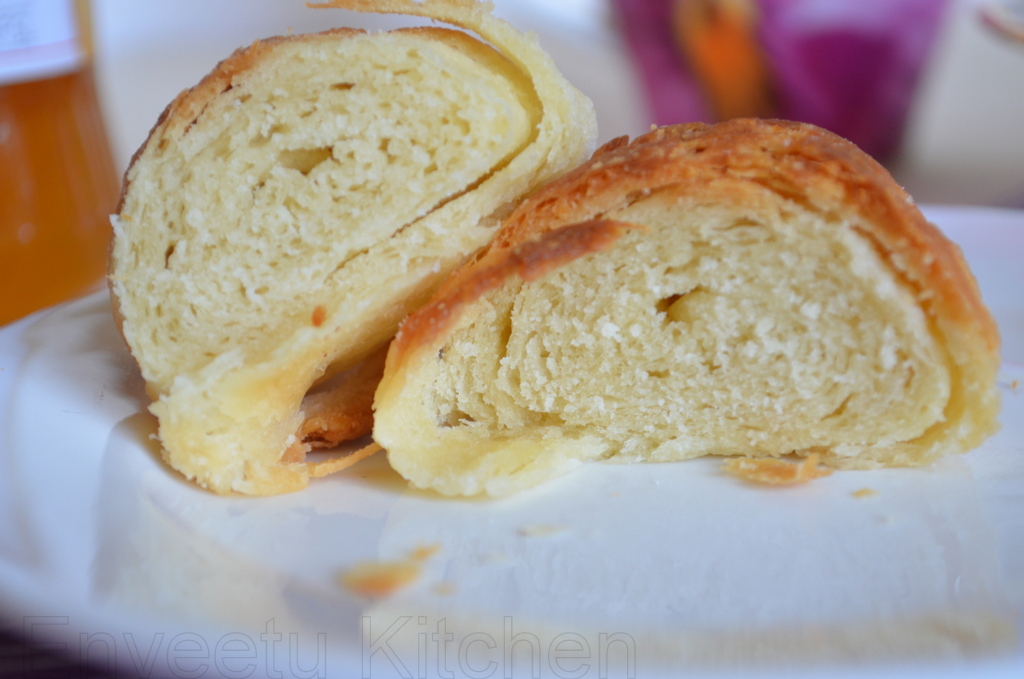
baking sheets on racks. - Serve warm. This recipe makes 15
croissants.
Important tips to get your Croissants right (Read them twice/thrice)
- Ensure that your butter is cold - cold enough that it is pliable enough to smoothly roll out; not hard (or it will break) or soft (it will melt). If the butter is too hard and breaks while rolling out the dough, you will not get the layers in the croissants.
- Do not over-knead / develop the dough too much, too much gluten will not help during the lamination process. The lamination process itself is a kind of stretch and fold anyway and will strengthen the dough. So keep to the 3 minutes the recipe says. You want a soft dough, not an elastic one.
- When you cover the butter square with the dough, make sure you seal the dough well, otherwise the butter will leak out when you roll out the dough, and there's no way you can manage to put the butter back in. You will also end up with butter leaking during the baking.
- Always, always make sure your dough and butter inside it are cold. I cannot stress the importance of this enough. Once the butter has melted, it is difficult to get the dough to produce layers because the dough tends to absorb the butter and will make greasy croissants. So, while working with the dough, or when rolling it out, if at any point you feel the dough becoming warm and soft, put it back in the fridge immediately. Also work as quickly as you can so the butter stays cold.
- During the lamination of the dough (rolling and folding repeatedly), chill the dough in the freezer and NOT the fridge. The overnight refrigeration is to be done in the fridge NOT in the freezer. Resting the dough is an important part of the croissant making process.
- Plan ahead and make sure you do all this when you have the time for it. You will need more time than you think you, believe me. You cannot leave this and attend to something else, unless you want to set yourself for failure!
- You also need a lot of patience to keep rolling out the dough with just enough pressure to stretch it. The rolled out dough before shaping should be somewhere between ¼" and ⅛" thick.
- Make sure your dough is shaped with straight lines and square-ish corners. All the time you are rolling your dough out, keep this in mind. This way you will minimise waste of dough. More importantly, the edges where there is no butter would get folded in during lamination and affect your layers. So trim off those bits if you have any of them.
- Keep lightly flouring your work surface (not too much), just enough to keep working smoothly without tearing the dough. However, dust with a light hand or you could end up adding more flour than desirable.
- Do not be tempted to fold more than three times. A fourth fold will give you more layers, but thinner butter layers between them, and your croissants will not puff of as much as you would like them to.

Ansh|Spiceroots says
This was a fun project to do. The pain au chocolat is really heavenly, do make that soon 🙂
kitchen queen says
lovely perfect croissants.
Ms.Chitchat says
Gorgeous croissants, thanks for the elaborate explanation of the procedure.nice clicks too.
Unknown says
Lovely flaky croissants 🙂 you have done it well...
Unknown says
yum, nicely done.
lata raja says
Raja says thank you for the mention 🙂 I understand it is difficult giving time to a process that requires full attention with an infant around. That you have made them is truly wonderful.
Unknown says
Priya,
I am soooo excited to see that Croissants can be made at home!! without eggs!! Aaaaaaagh! 🙂
Wonderful, thanks to you and Aparna. I think I should get inspired and join the gang at Knead to Bake
Siri
Priya Suresh says
Beautifull croissants, butter keeps me away from it else i'll be making some again, yours looks incredible.
Swathi says
Beautiful Croissant You made it well.
Unknown says
Its come out very well. Although a lengthy process but the outcome made you too happy right. Good going.